Things that are obvious are obvious!!!!!
I receive many emails regarding some of my projects. Sitting on this end I wonder a bit about those who send the emails. Mind you I am not saying I am infallible or not subject to error; but there is a difference between asking good questions and just being lazy.
Often I resist telling the sender to turn off his soldering iron and take up knitting as a hobby. This is not snobbery; but more symptomatic that many individuals find it easier to email Pete than to look up the information.
Here is an example of what I am saying. The sender tells me that his Arduino and OLED work FB when connected to his computer; but when he connects it to his power supply it will not work. He has done this cycle several times and the next step is to email me.
Well lets think about this for a minute as the only difference in these two situations is the source of power. It has nothing to do with the code or the hardware --it works on the USB port. So then I asked what are you powering the Arduino with in your rig? The response was 5 VDC. Boom fatal error.
If this individual bothered to read Arduino 101 he would find that Massimo Banzi is clear the minimum voltage level is 7 VDC and the max is 12 VDC. Why you ask? Well there is an on board regulator where the Arduino board takes Vin or Vraw and converts it to 5VDC for use on the board and even supplies 5VDC to a pin where you can tap that for other uses. On some of the Arduino boards, with the Pro-Mini being one exception, there is even a 3.3 Volt Regulator so you can provide power for the TFT displays. On the more complex sketches I usually include a Pin diagram in the comments. Yep you guessed it --got an email asking how to connect the color TFT. I asked did you read the comments. And the answer was... they are usually too technical for me so I don't read them. Say what?
Plugging in to the USB port on your computer is essentially bypassing the regulator. All voltage regulators need a higher Vin (typically at least 1.5 Volts higher) for them to work. So this noob didn't even know the basics of the Arduino. In most of my work I use a 9 VDC or 8 VDC three terminal regulator to feed the Arduino.
Then I got asked how to wire up the Si5351 and OLED and to provide a schematic. Well here is another case where the end user is not acquainting himself with the hardware. Seems like all folks want to do is hook up wires and be there. Well If I have to research it, so should you. Guys both the Si5351 and the OLED use the I2C buss. There are four connections to each and they are simply paralleled. Yah I know easier to email Pete!
So thinking just because I know, maybe I should help, so here is a paint by numbers approach for the hookup. [Wait until you hear the punch line.] So here we are.
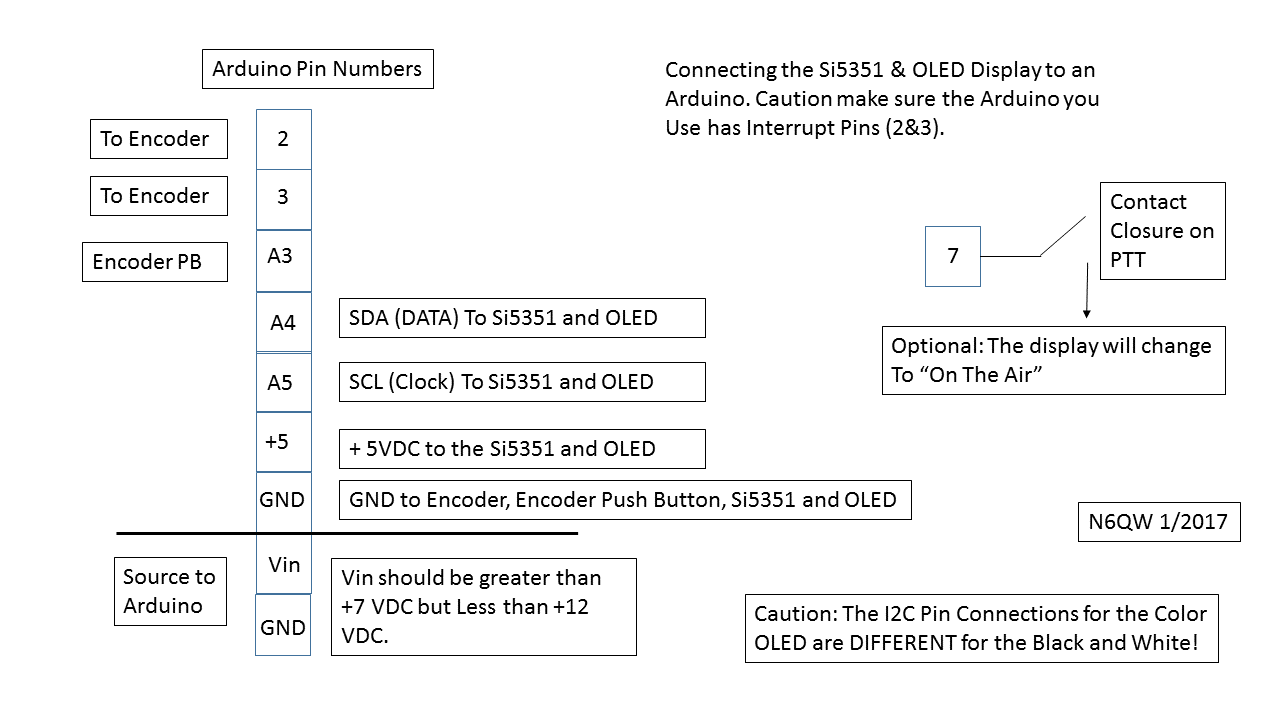
I didn't want to create a schematic since that presumes current end users know the How to Read a schematic. So after responding to this individual --the Punch line --"you didn't specify where you connect outputs of the Si5351". WELL folks if you read the sketch you will see that CLK0 is the LO and CLK2 is the BFO. C'mon guys --you have to do some of the work!!!!!
I don't mind answering legitimate questions; but if one has to ask how to connect to an I2C buss or what are the output pins for the Si5351 --then knitting truly might be a good hobby for you.
73's
Pete N6QW


