FT-8 with a Raspberry Pi!
8/11/2019 ~FT-8 With a Raspberry Pi ZERO.
When the Pi Zero came out at a cost of $5, I bought one. I soon found it was useless! No wonder it cost $5. The reason for my comment was the slow speed, lack of RAM and no USB ports other than the single one that you had to have an adapter for! [Mine is an early version with no WiFi.]


So yesterday I wondered if it would work with my digital adapter and HDR rig for FT-8. Boom we now have a use for the useless Pi Zero. I also have a small powered USB Dock which I installed on the Pi Zero and that now gave me 4 USB Ports.
Using the NOOBS 3.2 and the WSJTX it will work doing FT-8. The slowness of the processor and lack of RAM is not an issue. That said -- it groaned when I tried to do QUISK. So for a compact FT-8 perhaps with a 5 Inch HDMI, the Pi Zero might just be the ticket.
BTW using my RADIG you don't need all of the extra peripheral crap (CRAP= Capacitors, Resistors And other Parts). The Digital Adapter is already in the hardware!
BTW using my RADIG you don't need all of the extra peripheral crap (CRAP= Capacitors, Resistors And other Parts). The Digital Adapter is already in the hardware!
Pete N6QW
**************************************************
So why am I wasting your time as I already demonstrated using the RADIG ion FT-8. If you are now bored stop reading!
But many readers of this blog will never build a RADIG as it may either be in conflict with those who are ardent HDR guys or it just seemed to hard to connect all of the SDR bits (and bytes) together.
The subject of this post is that taking one of my conventional HDR rigs and using the N6QW designed Digital Adapter mated with a Raspberry Pi3 --I worked FT-8. Formerly I had to use a Laptop, Big Desktop or a Netbook to work the digital modes. But yesterday I asked myself --can this be done using just the RPi.
So for those HDR guys first you need a Raspberry Pi (in some form) then load NOOBS 3.2 onto an SD Card and then download/install the WSJTX software. The detail of the N6QW Digital Adapter was included on my N6QW website This adapter also utilizes the Sabrent Sound Card Dongle.
You can down load WSJTX from
Find the Linux form "arm.deb" and download that onto the RPi3. Once it is downloaded find it in the download folder and and right click on the file and one of the options is to install it right from that location.
You will also have to find the sound card settings using the drop down RPi menu under Preferences -Audio settings. If I have to further explain about selecting controls etc. stop here and proceed no further
Now you will have to setup the WSJTX and if you got this far then email me at n6qwham@gmail.com and I will send you some photos of what to put in the settings page of wsjtx. Otherwise get back to your ICOM7300 manual and read about the 10K settings you can make. Or open your QST to read about the latest contest or latest rig review.
So OK too hard to email Pete and being a BTE below your dignity... Make your pages look like this for the wsjtx settings.
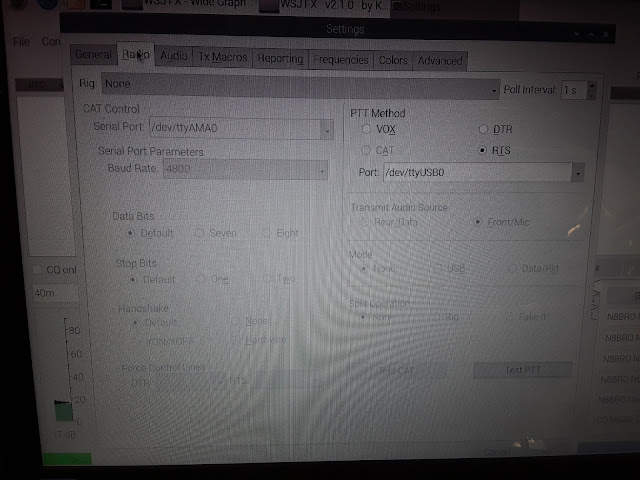


73's
Pete N6QW
You will also have to find the sound card settings using the drop down RPi menu under Preferences -Audio settings. If I have to further explain about selecting controls etc. stop here and proceed no further
Now you will have to setup the WSJTX and if you got this far then email me at n6qwham@gmail.com and I will send you some photos of what to put in the settings page of wsjtx. Otherwise get back to your ICOM7300 manual and read about the 10K settings you can make. Or open your QST to read about the latest contest or latest rig review.
So OK too hard to email Pete and being a BTE below your dignity... Make your pages look like this for the wsjtx settings.


73's
Pete N6QW


