Wednesday, January 18, 2017

A Time for Ranting!

Things that are obvious are obvious!!!!!


I receive many emails regarding some of my projects. Sitting on this end I wonder a bit about those who send the emails. Mind you I am not saying I am infallible or not subject to error; but there is a difference between asking good questions and just being lazy.
 
Often I resist telling the sender to turn off his soldering iron and take up knitting as a hobby. This is not snobbery; but more symptomatic that many individuals find it easier to email Pete than to look up the information.
 
Here is an example of what I am saying. The sender tells me that his Arduino and OLED work FB when connected to his computer; but when he connects it to his power supply it will not work. He has done this cycle several times and the next step is to email me.
 
Well lets think about this for a minute as the only difference in these two situations is the source of power. It has nothing to do with the code or the hardware --it works on the USB port. So then I asked what are you powering the Arduino with in your rig? The response was 5 VDC. Boom fatal error.
 
If this individual bothered to read Arduino 101 he would find that Massimo Banzi is clear the minimum voltage level is 7 VDC and the max is 12 VDC. Why you ask? Well there is an on board regulator where the Arduino board  takes Vin or Vraw and converts it to 5VDC for use on the board and even supplies 5VDC to a pin where you can tap that for other uses. On some of the Arduino boards, with the Pro-Mini being one exception, there is even a 3.3 Volt Regulator so you can provide power for the TFT displays. On the more complex sketches I usually include a Pin diagram in the comments. Yep you guessed it --got an email asking how to connect the color TFT. I asked did you read the comments. And the answer was... they are usually too technical for me so I don't read them. Say what?
 
Plugging in to the USB port on your computer is essentially bypassing the regulator. All voltage regulators need a higher Vin (typically at least 1.5 Volts higher) for them to work. So this noob didn't even know the basics of the Arduino. In most of my work I use a 9 VDC or 8 VDC three terminal regulator to feed the Arduino.
 
Then I got asked how to wire up the Si5351 and OLED and to provide a schematic. Well here is another case where the end user is not acquainting himself with the hardware. Seems like all folks want to do is hook up wires and be there. Well If I have to research it, so should you. Guys both the Si5351 and the OLED use the I2C buss. There are four connections to each and they are simply paralleled. Yah I know easier to email Pete!
 
So thinking just because I know, maybe I should help, so here is a paint by numbers approach for the hookup. [Wait until you hear the punch line.] So here we are.
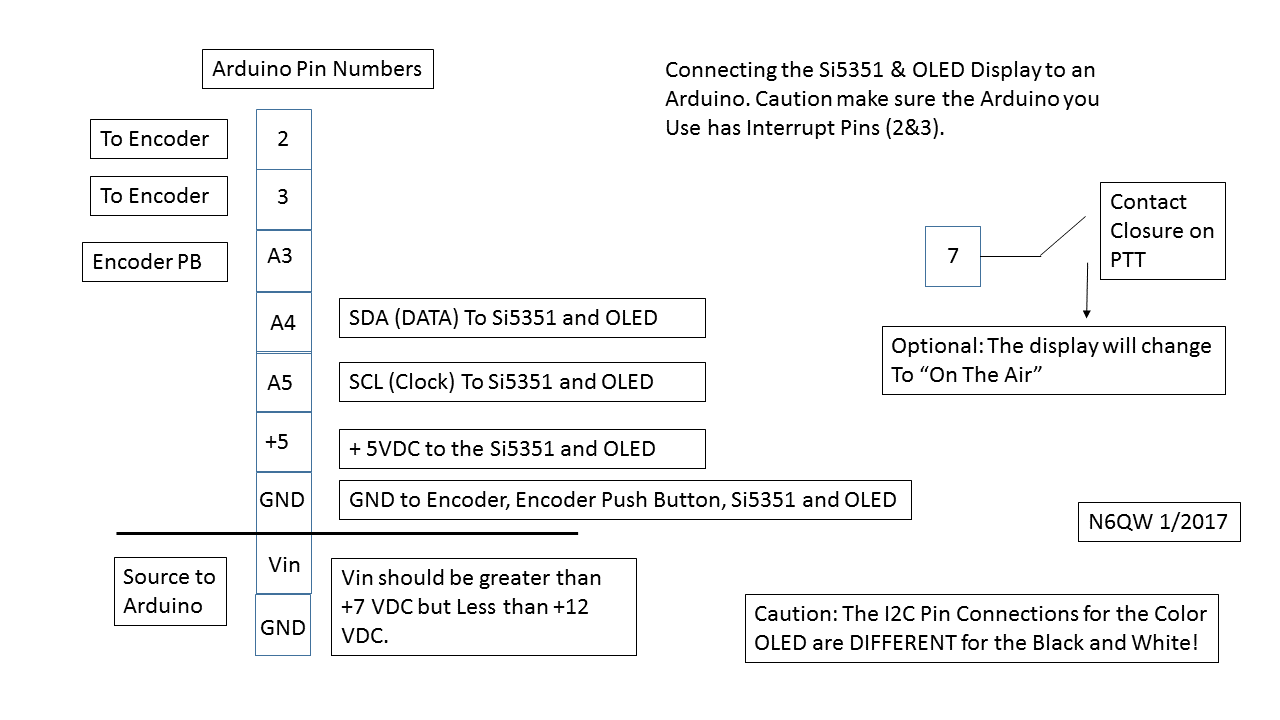
 
I didn't want to create a schematic since that presumes current end users know the How to Read a schematic. So after responding to this individual --the Punch line --"you didn't specify where you connect outputs of the Si5351". WELL folks if you read the sketch you will see that CLK0 is the LO and CLK2 is the BFO. C'mon guys --you have to do some of the work!!!!!
 
I don't mind answering legitimate questions; but if one has to ask how to connect to an I2C buss or what are the output pins for the Si5351 --then knitting truly might be a good hobby for you.
 
73's
Pete N6QW

Saturday, January 14, 2017

A visit with an old friend ~ The KWM-4!

A Visit with an Old Friend!


1/17/2017 ~ Scratch built homebrew rigs!

 
Late in 2012, I decided to build a solid state version of the famous Collins KWM-2. This now must totally convince you that I am several corn flakes short of a full bowl. Well take a look at the masthead photo and you will see that I was successful. My KWM-4 even sports a keypad (like in the KWM-380) and two of the buttons let you up / down tune the rig. Try that with your Bitx40.
 
It has been some time since I last had it on the air so today was a good day to light up the old rig. The KWM-4 is QRP in that it will  produce 5 watts on SSB. About now I am expecting a correction on what constitutes QRP from some of the illuminati. Anyway I have temporarily put aside the FPM5 while I noodle a low drive condition on the higher bands which may entail a redesign of the famous EMRFD driver stage. Sometimes you will find EMRFD circuits are not pantyhose where one size fits all!
 
For those who may not know this, my KWM-4 is a dual conversion transceiver with the 1st IF at 10.7 MHz which puts it close to the 10 MHz ham band. For me it was an easy decision and I skipped 30 Meters but since I am not a CW fan it was no loss. The second IF is at 455 kHz and uses a tubular Collins mechanical filter. There is actually a crystal filter following the 1st conversion which use a 7.5 kHz wide  at 10.7 MHz for this application. This solves a problem when you up convert a 455 kHz SSB or CW signal for the subtractive mix that would put an undesired signal too close the band pass filters. Yes Virginia some real innovation in this rig. This is one of my few rigs that can actually do CW and features a separate CW oscillator that on transmit bypasses the mechanical filter. More innovation here. The KWM-4 works on 80, 40, 20 15, 17 and 10 Meters
 
More details of the KWM-4 are shown on my QRZ.com page under N6QW. As you will note there are many rigs on that page and so this is not just a one hit wonder!
 
73's
Pete N6QW


Simpleceiver with an OLED
 
1/15/2017 ~ You Tube Video of Simpleceiver with the OLED and Si5351. This was made especially for those individuals with fancy smart phones and exotic tablets who could not open the movies below. C'mon guys I am doing all the hard work the least you could do is use a real computer to view this blog!


This video is also being provided for those who tried to put the OLED and Si5351 in a Bitx40 project and had noise problems with noise being generated by the OLED. You can decide about any noise issues after listening to this test with the Simpleceiver.
 
73's
Pete N6QW


Late in 2015 I developed a project called the Simpleceiver which was fully documented on this blog. The evolution of the design relied heavily of the use of LT Spice to simulate circuits and to "make" Dual Gate MOSFETs by cascading J310 JFET's. I know of several duplications of this project both in Europe and in Asia. For a display I used a 16X2 LCD.
 
Fast forward to today where I am now using OLED's in various projects thus the foray into retrofitting the Simpleceiver with an OLED. There are several video that are presented below and you can listen closely to the audio as there have been reports of noise issues when using the OLED's. You be the judge.


The OLED, Si5351 and the Nano offer many possibilities especially for removing analog VFO's (you know the ones that drift) from your old homebrew gear and installing the new technology. A $20 Bill will put you on that road.
 
 
73's
Pete N6QW


Thursday, January 12, 2017

Shirt Pocket Transceiver with the Si5351 and OLED

Moving on with the latest Technology!


In 2011 I fulfilled a dream of building a shirt pocket sized QRP SSB transceiver. Well actually I built two of them and the second was a diminutive 2" X 4" X 2". Both used through hole components --so no cheating with SMD. In each case the IF was 4.0152 MHz and employed a crystal switched VXO that essentially gave about 100 kHz on 20M SSB. But it was a VXO and there was not full band coverage. But nevertheless a small miracle (or so I thought) that they both worked! You can see the two versions blow.


But with new technology now available to us my next goal is to fit the larger rig with the Si5351 and an OLED display. Today I made that happen!


We now have a documented QSO with VA7LTX in Canada using the rig barefoot ( 2 to 3 watts) on 20M.


Having proven this works I am now undertaking building a smaller board to fit in the existing case. This should incentivize you to get out the soldering iron and start building!!!!
 
 
73's
Pete N6QW


Wednesday, January 11, 2017

Bitx40 Operating with a Hombrew PLL and OLED Display.

You won't find this on EMRFD or QST!

My Bitx40 Operating with a homebrew PLL and OLED Display!


My Bitx40 with Homebrew PLL and OLED Display!


Don't you just love it when a plan comes together!!
 
 
73's
Pete N6QW

Monday, January 9, 2017

Back to Bitx40 and OLED Displays

Expanding the Bitx40 Horizon ... More Hacks!

1/10/2017 ~ I was asked what does Size 1 look like on the display?


The frequency information is in Size 2 and the other info was in size 1. I guess it is readable but small letters. It is obvious you could pack more info on to the display. But I think I will stick with Size 2.
 
73's
Pete N6QW


1/9/2017 Posting


In the course of adding a few refinements to my Bitx40 OLED display, I now have found  new dimensions to displaying information and some additional possibilities for the rig. In the realm of "cool factor" I now have managed to juggle information locations so I can include my call sign (N6QW) on the display.

This is not ego stuff but more of displaying pride in your homebrew rig. Well there is some ego stuff too, where it is something I did and you can too!. BTW you can adjust the print size of what is displayed and what you see is Size 2. The Size 1 selection is almost unreadable but none the less gets you "The Lord's Prayer" on the head of a pin head. Keep in mind the size of the display below is less than 1 inch on a side.

A bit more of what happens to the display and the capabilities when various modes are exercised. The display shows a 100 Hz step tuning rate which is the default setting. Engaging the Push Button located on the encoder control will step that to 1 kHz, 10 kHz, 10 Hz and then back to 100 Hz. The display will show each of these steps. Additionally when you hit the Push To Talk Switch on the Microphone the display changes the line "Bitx40" to "On the Air". When the button is released the display reverts back to "Bitx40". Pretty cool!

I feel confident these are changes that could be done to the VU2ESE supplied LCD/Arduino Nano/Si5351as the changes are in information displayed but does not disturb how frequencies are generated. So maybe someone reading this blog and has the VU2ESE board can make the changes and contact VU2ESE to include it on the hfsigs hack page.


The other aspect is the ability to tune outside of the ham bands which in this case shows a frequency of almost 33 kHz above "40 meters". This feature is good for listening only! I don't believe there is any world wide amateur operation permitted above 7.300 MHz; but there are shortwave broadcast stations that operate in this range. There are even websites that will help you locate these stations based on the frequency being read on your display.
 
Now before you get too excited -- typically the designs of our transceivers include Band Pass and Low Pass Filters. These filters by design limit your frequency excursions (especially on the transmit side). So tuning 30 to 50 KHz above or below 40 Meters will result in your ability to hear stations. A well designed set of filters will make it seem like the rig has gone deaf once you get slightly above or below the specific band --it should work like that!
 
Another limitation is what are the frequency end points set in the Arduino code. So in addition to the hardware limits (BPF and LPF) there are frequency limits typically coded into the sketch. Thus one of the hacks is to somewhat expand the lower and upper frequency limits so that the Arduino will tune either the AD9850 or Si5351 slightly above and below the 40 Meter Band.
 
The rig now being sold by VU2ESE includes the LCD display along with the Arduino Nano and the Si5351. I am unaware of the limits set in the code. So if you have one of the new rigs drop me an email N6QW  and let me know the limits. Of course I "rolled my own" so I picked the limits.
 
My OLED is now being driven with an Arduino Nano (versus what I did for the original development using the Uno). One report I received from Mike WA3O who is using an OLED with his Bitx40 is that he is hearing noise generated in the OLED being induced into the Bitx40. He further advised that having a separate power supply for Arduino/OLED abated the noise generation problem. Thus I have not had the OLED in the rig but will run that test and report the results.
 
More refinements the 100's, 10's and 1's are displayed in a window like view of the actual frequency. Helps focus quickly where you are in the band. Another hack!


73's
Pete N6QW


Sunday, January 8, 2017

A Diversion from all the Bitx40 Stuff!

Does anyone in Radio Land know what this is?


 OK do you give up? Well guys and gals this is the world's most important tool vintage 1965 if you were in a forward combat area and wanted to eat. Yes this foldable, carry on your key chain, (along with your dog tags) is a can opener! I have had it on my key chain for the past 52 years and serves as a reminder of another time and another place.
 
In May of 1965 while assigned to MCB Ten (US Navy Mobile Construction Battalion Ten) as a part of the US Marine Corp RLT4 (Regimental Landing Team 4). RLT4, we made the first over the beach amphibious landing since the Korean War. It was a heady time filled with excitement as we landed on the beaches of Chu Lai, South Vietnam about 90 miles south of DaNang.
 
With such a landing comes combat rations (for about two months) known as MIC's which stands for Meal Individual Combat. The MIC's came in cases of 12 meals and included in every case were several of these tools and a pack of heat tabs so you could have a warm meal.
 
There were four selections of MIC's and included Turkey Noodle Loaf, Beanies and Weenies, Hot Ham Hunks and Hamburgers which  literally were packed in axle grease. Accoutrements might include a small bread in a can along with grape jelly, cheese and crackers and the most coveted canned peaches. The cheese and crackers were actually medicinal in nature and you usually did not eat those immediately but held on to them for when you got the "Green Apple Quick Step" AKA GI Trots, AKA The Runs. Eating one portion of the cheese and crackers would plug you up quicker than any Kaopectate or Imodium! It seems like the crackers were designed so when taken with water expanded to about 10X their size --so you really felt full (bloated is more like it).
  
 
Being in the "Seabee's" the first thing you learn to do is to take the can opener and using a spent can from the Beanies and Weenies (taller can)  build a small stove so you can efficiently heat your food. The heat tab went in the bottom of the can and with proper vent holes cut in the can itself --instant stove. (This was my first opportunity at learning metal working skills which has paid big dividends today.)
 
There also was included in every MIC a small pouch that had cigarettes, toilet paper and a spork -- that was a plastic spoon with serrated teeth on the end so it was a combo spoon and fork. I think there might have been some other stuff in there but it was kind of clever. I think later on they removed the cigarettes --getting killed with bullets is just a day's work but lung cancer was not approved.
 
The reason for this posting was that recently I tripped over a whole series of you tube videos where individuals actually take the various combat meals and try to explain them It goes from the K Rations to C Ration to the MRE's of today. It is very obvious that the narrators never had to eat these meals. They just didn't know!
 
My assignment at MCB 10 was the Intelligence Officer and as such I had access to the classified safes. In the Spring of 1965 it was very obvious to me that we would be headed to South Vietnam and would transition  as the alert battalion on Okinawa to an in country location. In preparation for the deployment I cleared space in one of the files so it would hold six bottles of Johnny Walker Black Label whiskey. There was some benefit to being the only one who had access to the classified safes! At the time I had a 1st Class Petty Officer working for me and he approached me about his also placing something in the classified safe. I said OK -- well as it turns out his contribution was a very small box that contained 12 bottles of what is shown below:


At first I thought he was nuts; but so be it! Well as it turned out my 1st Class Petty Officer was a veteran of the Korean war some 15 years earlier and he knew all about C rations. After a short while I traded him 3 bottles of Johnny Walker for three bottles of the hot sauce. The only way you could eat those MIC's was with hot sauce.
 
Being the Intelligence Officer meant I had to have special security clearances which later came back to bite me. On a second trip to Vietnam where I was TDY it bit me. I was on a commercial contract flight (DC8) that was just about to depart Travis Air Force base when I heard my name called out over the PA and was asked to come forward. There were two Air Force officers there who then asked me to show my ID card which I did. One of them then said stick out your left wrist --I did. Boom the next thing I know they slap a handcuff on my wrist an attached to that was a courier pouch. It seems like this was highly sensitive information that could only be carried by someone with the appropriate clearance.
 
The next couple of statements were kind of frightening where I was advised to shoot anyone who tried to get the pouch from me and he was about to hand me a gun. I said I have a 45 in my brief case but no ammo --he got me two clips. of 45 ammo. The next statement was I could not leave the plane until I was relieved of the pouch in Honolulu.
 
Did you ever try to snooze in a packed  airplane with a pouch handcuffed to your left wrist. Going to the head for a pit stop was a barrel of laughs. The heads are really small and not much room for you AND the pouch. Well at the other end I had to wait 1 hour for someone to show up --it was not a fun trip! I keep thinking about trying to board an airplane today with a 45 in your brief case!
 
 
73's
 
Pete N6QW


Friday, January 6, 2017

More Hacking of the Bitx40

Still even more Hacking of the Bitx40!


1/7/2017 ~ Dress up your OLED Display!

Same code works for the Color or Black and White OLED


So there is no reason why your Bitx40 cannot have the finished feature rich appearance just like those kilobuck black boxes. Imagine that when you show off your rig to your friends you can get the OOOhs and Ahhhs and "Gee how do I do that" comment. Well you could check the EMRFD reflector but you might not find it there. QST probably doesn't have it either. But N6QW does!

Here is what I am saying! The OLED will have one display feature during receive but hit the PTT and the OLED displays something else. Release the PTT and it goes back to the normal mode. Now how cool is that?

This feature only takes a small additional modification to the hack I provided to switch in line an external linear amplifier. Yes I figured out the code kink. Email me at n6qwham@gmail.com if you would like the code snippet. So aside from the code you will two diodes and one reed relay.

Another Bitx40 hack on the drawing boards is how to remotely start the coffee pot while you are in a QSO.

As Sir Winston Churchill so aptly said KBO!

73'ws
Pete N6QW

BTW the Black and White version was the original development work for use on a 20M Transceiver. When I got it working it was a short distance to the Bitx40. Find that on EMRFD or QST?


Yet another hack of the Bitx40!

1/7/2017 The Arduino Sketch will be posted on my website using the link below. It will be on the Phase 7 page link.


Think small and smaller! When I built my Bitx40, the display add on  kit which I think now is the standard was not available. So in true ham fashion I simply "rolled my own". I thought I really got things small when I used an 8X2 backlit LCD coupled with the Pro-Mini  and AD9850
 
Well now there is something even smaller which I have working. See below. The size is less than one inch on a side. There are four step tuning ranges and include 10, 100, 1K, and 10K Hz. I am still working out a "code kink" so that when you transmit the "Bitx40" is replaced by the message "On The Air".
 
With the OLED + Si5351 it should be possible to shrink even further the overall footprint of the Bitx40. Not only is the physical size smaller; but the power requirements are significantly reduced. The new configuration will have the OLED, Pro-Mini and the Si5351.
 
Yes I could just buy the add on kit --but the rig was designed to be hacked!!!!!
 
73's
Pete N6QW 

The Risk of Power.

 What happens when the faithful lose faith? We don't know the result but now it is time to pop more popcorn as the interesting part of t...